前言: 这篇介绍下flutter 在一个页面的简单布局, 以及进行网络数据解析的示例代码
- 普通文本
- 格式文本
- 普通按钮
- 漂浮按钮
- 输入框
- wrap/flow 布局的简单演示
- 数据请求以及简单解析
| - UI | - 数据演示 |
|---|---|
 |
 |
1. 创建一个 my app
1
2
3
4
5
6
7
8
9
10
11
12
13
14
15
16
17
void main() => runApp(const MyApp());

class MyApp extends StatelessWidget {
  const MyApp({super.key});

  /// app 主题以及首页
  @override
  Widget build(BuildContext context) {
    return MaterialApp(
      title: 'Flutter Demo',
      theme: ThemeData(
        primarySwatch: Colors.blue,
      ),
      home: HomePage(),
    );
  }
}
2. 创建一个大的 Container
1
2
3
4
5
6
7
8
9
10
11
12
13
14
15
16
17
18
19
20
21
/// 这个是最大的一个容器, 用来放置子视图
Widget _setupContainer() {
  return Container(
    constraints: BoxConstraints.expand(
      height: 667,
    ),
    padding: EdgeInsets.all(8.0),
    child: CenterColumnRoute(),
    alignment: Alignment.center,
    transform: Matrix4.identity(),
    margin: EdgeInsets.all(16.0),
    decoration: BoxDecoration(
        border: Border.all(color: Colors.black, width: 2.0),
        color: Color.fromARGB(255, 181, 231, 237),
        borderRadius: BorderRadius.circular(20.0)),
    foregroundDecoration: BoxDecoration(),
    height: 667,
    width: 375,
    //color: Colors.blue[200],
  );
}
3. 布局子控件, 详细对照 demo 和 UI 查看
1
2
3
4
5
6
7
8
9
10
11
12
13
14
15
16
17
18
19
20
21
22
23
24
25
26
27
28
29
30
31
32
33
34
35
36
37
38
39
40
41
42
43
44
45
46
47
48
49
50
51
52
53
54
55
56
57
58
59
60
61
62
63
64
65
66
67
68
69
70
71
72
73
74
75
76
77
78
79
80
81
82
83
84
85
86
87
88
89
90
91
92
93
94
95
96
97
98
99
100
101
102
103
104
105
106
107
108
109
110
111
112
113
114
115
116
117
118
119
120
121
122
123
124
125
126
127
128
129
130
131
132
133
134
135
136
137
138
139
140
141
142
143
144
145
146
147
148
149
150
151
152
153
154
155
156
157
158
159
160
161
162
163
164
165
166
167
168
169
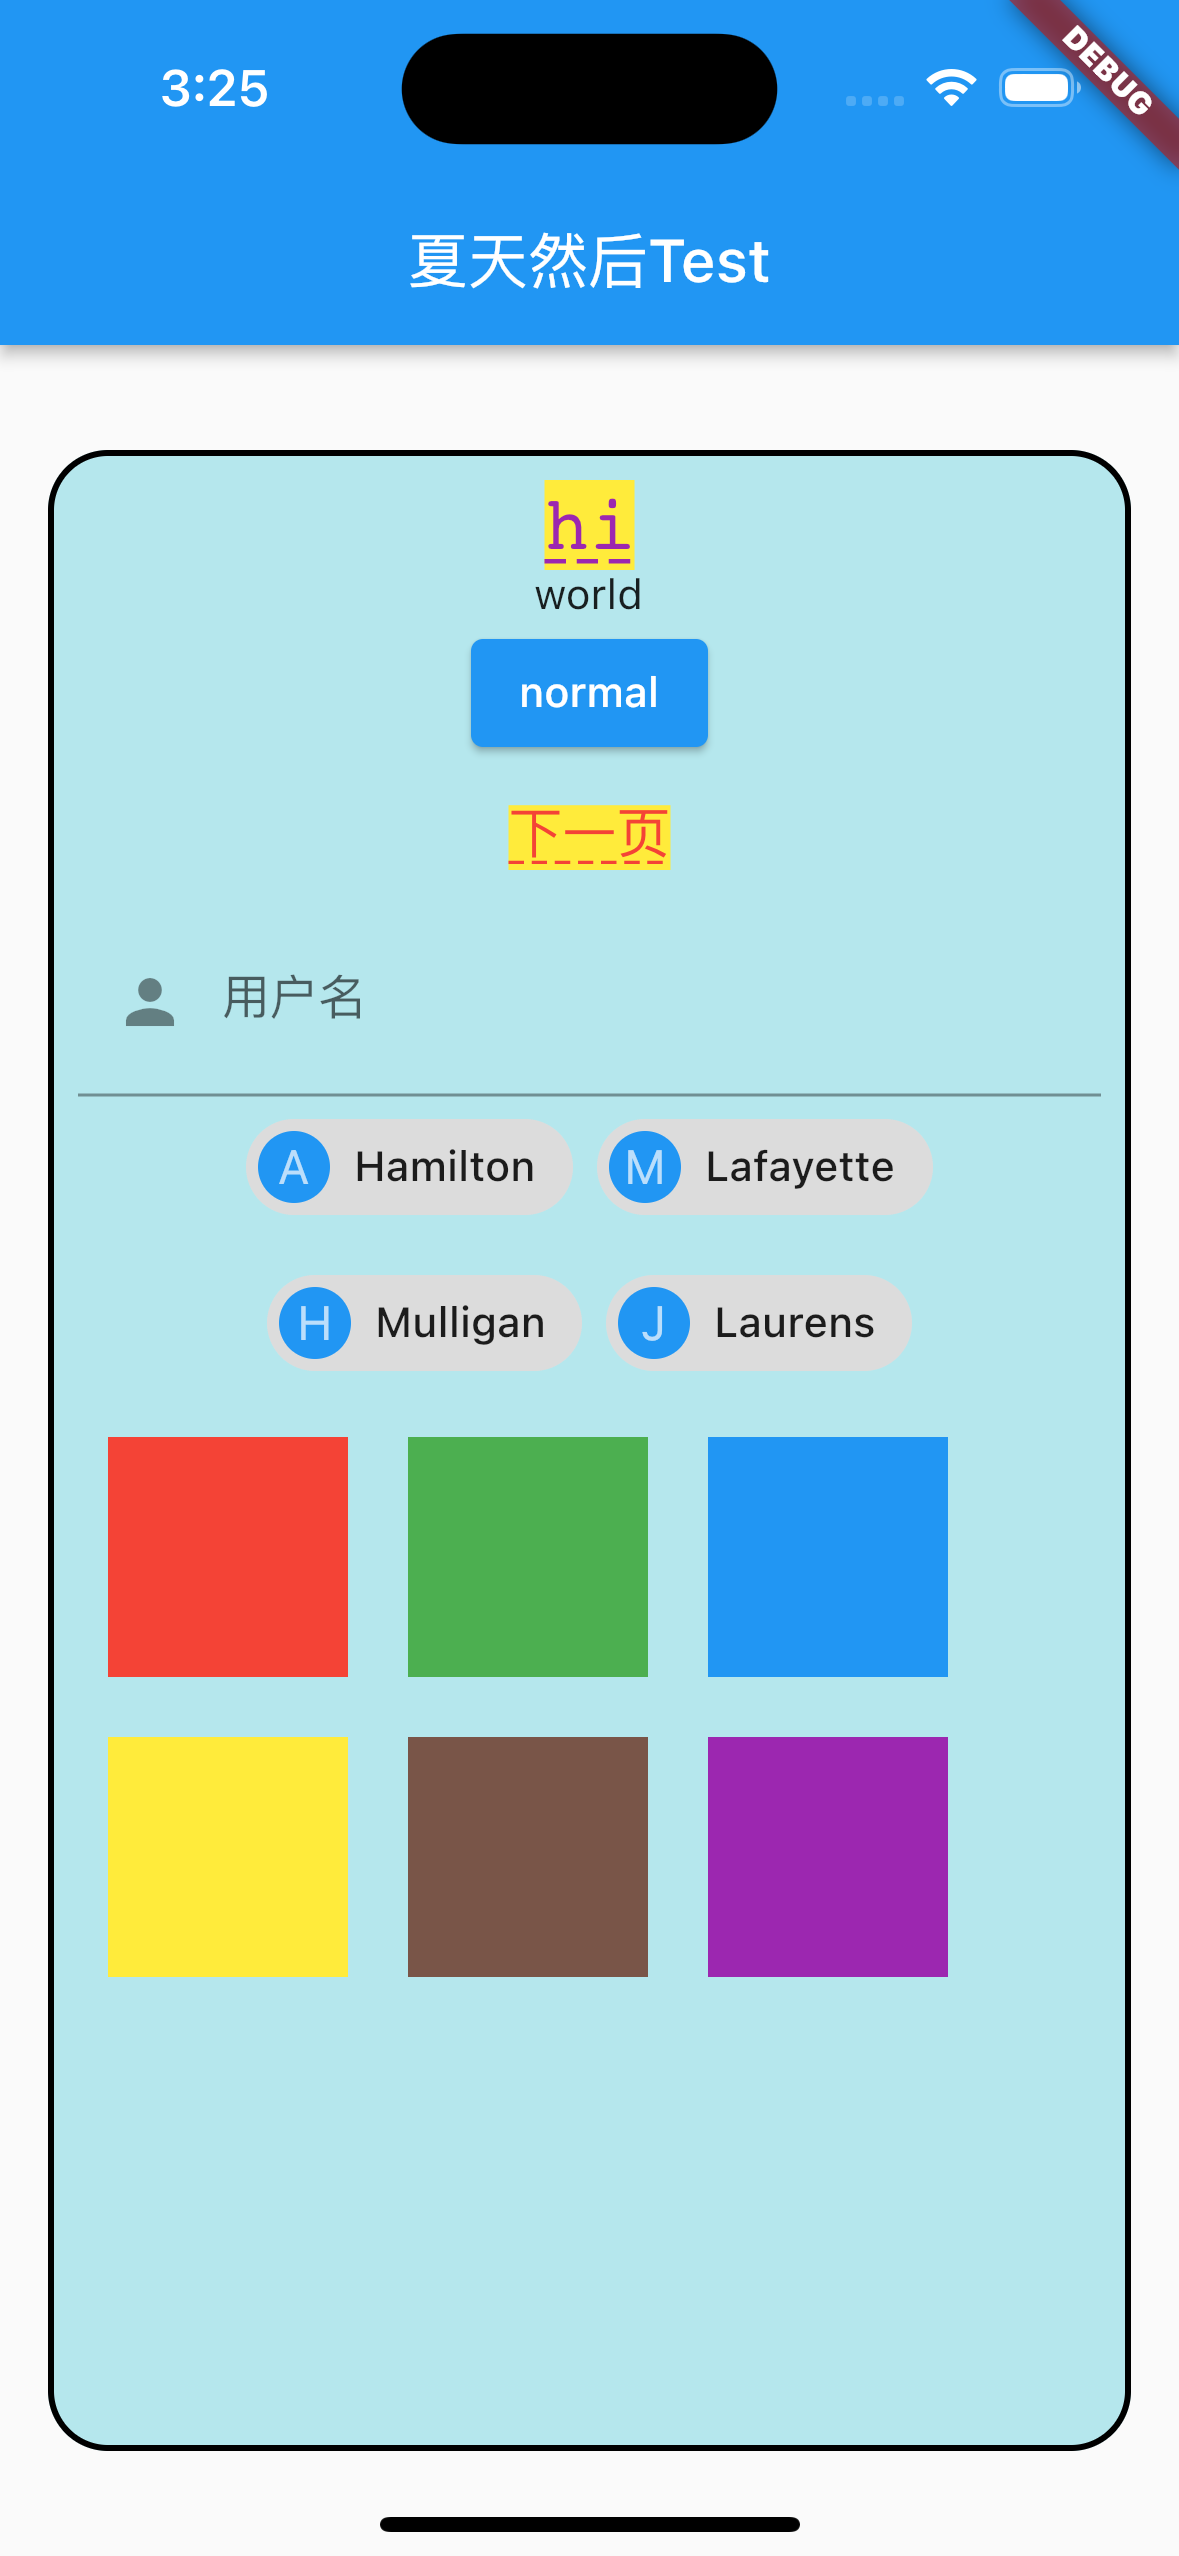
class CenterColumnRoute extends StatelessWidget {
@override
Widget build(BuildContext context) {
return Column(
crossAxisAlignment: CrossAxisAlignment.center,
children: <Widget>[
// 自定义样式文本
Text(
"hi",
style: TextStyle(
color: Colors.purple,
fontSize: 25.0,
height: 1.2,
fontFamily: "Courier",
background: Paint()..color = Colors.yellow,
decoration: TextDecoration.underline,
decorationStyle: TextDecorationStyle.dashed),
),
// 普通文本
Text("world"),
// 漂浮按钮
ElevatedButton(
child: Text("normal"),
onPressed: () {},
),
// 文本按钮
TextButton(
child: Text(
"下一页",
style: TextStyle(
color: Colors.red,
fontSize: 18.0,
height: 1.2,
fontFamily: "Courier",
background: Paint()..color = Colors.yellow,
decoration: TextDecoration.underline,
decorationStyle: TextDecorationStyle.dashed),
),
// 点击事件
onPressed: () {
print("按钮点击");
Navigator.push(
context,
MaterialPageRoute(builder: (context) {
return NewRoute();
}),
);
},
),
// 输入框
TextField(
autofocus: true,
onChanged: (v) {
print("onChange: $v");
},
decoration: InputDecoration(
labelText: "用户名",
hintText: "用户名或邮箱",
prefixIcon: Icon(Icons.person)),
),
// 四个 Text布局
Wrap(
spacing: 8.0, // 主轴(水平)方向间距
runSpacing: 4.0, // 纵轴(垂直)方向间距
alignment: WrapAlignment.center, //沿主轴方向居中
children: <Widget>[
Chip(
avatar:
CircleAvatar(backgroundColor: Colors.blue, child: Text('A')),
label: Text('Hamilton'),
),
Chip(
avatar:
CircleAvatar(backgroundColor: Colors.blue, child: Text('M')),
label: Text('Lafayette'),
),
Chip(
avatar:
CircleAvatar(backgroundColor: Colors.blue, child: Text('H')),
label: Text('Mulligan'),
),
Chip(
avatar:
CircleAvatar(backgroundColor: Colors.blue, child: Text('J')),
label: Text('Laurens'),
),
// 六个方块的布局
Flow(
delegate: TestFlowDelegate(margin: EdgeInsets.all(10.0)),
children: <Widget>[
Container(
width: 80.0,
height: 80.0,
color: Colors.red,
),
Container(
width: 80.0,
height: 80.0,
color: Colors.green,
),
Container(
width: 80.0,
height: 80.0,
color: Colors.blue,
),
Container(
width: 80.0,
height: 80.0,
color: Colors.yellow,
),
Container(
width: 80.0,
height: 80.0,
color: Colors.brown,
),
Container(
width: 80.0,
height: 80.0,
color: Colors.purple,
),
],
)
],
)
],
);
}
}
class TestFlowDelegate extends FlowDelegate {
EdgeInsets margin;
TestFlowDelegate({this.margin = EdgeInsets.zero});
double width = 0;
double height = 0;
@override
void paintChildren(FlowPaintingContext context) {
var x = margin.left;
var y = margin.top;
//计算每一个子widget的位置
for (int i = 0; i < context.childCount; i++) {
var w = context.getChildSize(i)!.width + x + margin.right;
if (w < context.size.width) {
context.paintChild(i, transform: Matrix4.translationValues(x, y, 0.0));
x = w + margin.left;
} else {
x = margin.left;
y += context.getChildSize(i)!.height + margin.top + margin.bottom;
//绘制子widget(有优化)
context.paintChild(i, transform: Matrix4.translationValues(x, y, 0.0));
x += context.getChildSize(i)!.width + margin.left + margin.right;
}
}
}
@override
Size getSize(BoxConstraints constraints) {
// 指定Flow的大小,简单起见我们让宽度竟可能大,但高度指定为200,
// 实际开发中我们需要根据子元素所占用的具体宽高来设置Flow大小
return Size(double.infinity, 200.0);
}
@override
bool shouldRepaint(FlowDelegate oldDelegate) {
return oldDelegate != this;
}
}
4. 网络请求
- 定义一个HttpTestRoute类
- 同时监听, text, name的变化改变 UI text 的赋值
1
2
3
4
5
6
7
8
9
10
11
12
13
14
15
16
17
18
19
20
21
22
23
24
25
26
27
28
29
30
31
32
33
34
35
36
37
38
39
40
41
42
43
44
45
46
47
48
49
50
51
52
53
54
55
56
57
58
59
60
61
62
63
64
65
66
67
68
69
70
71
72
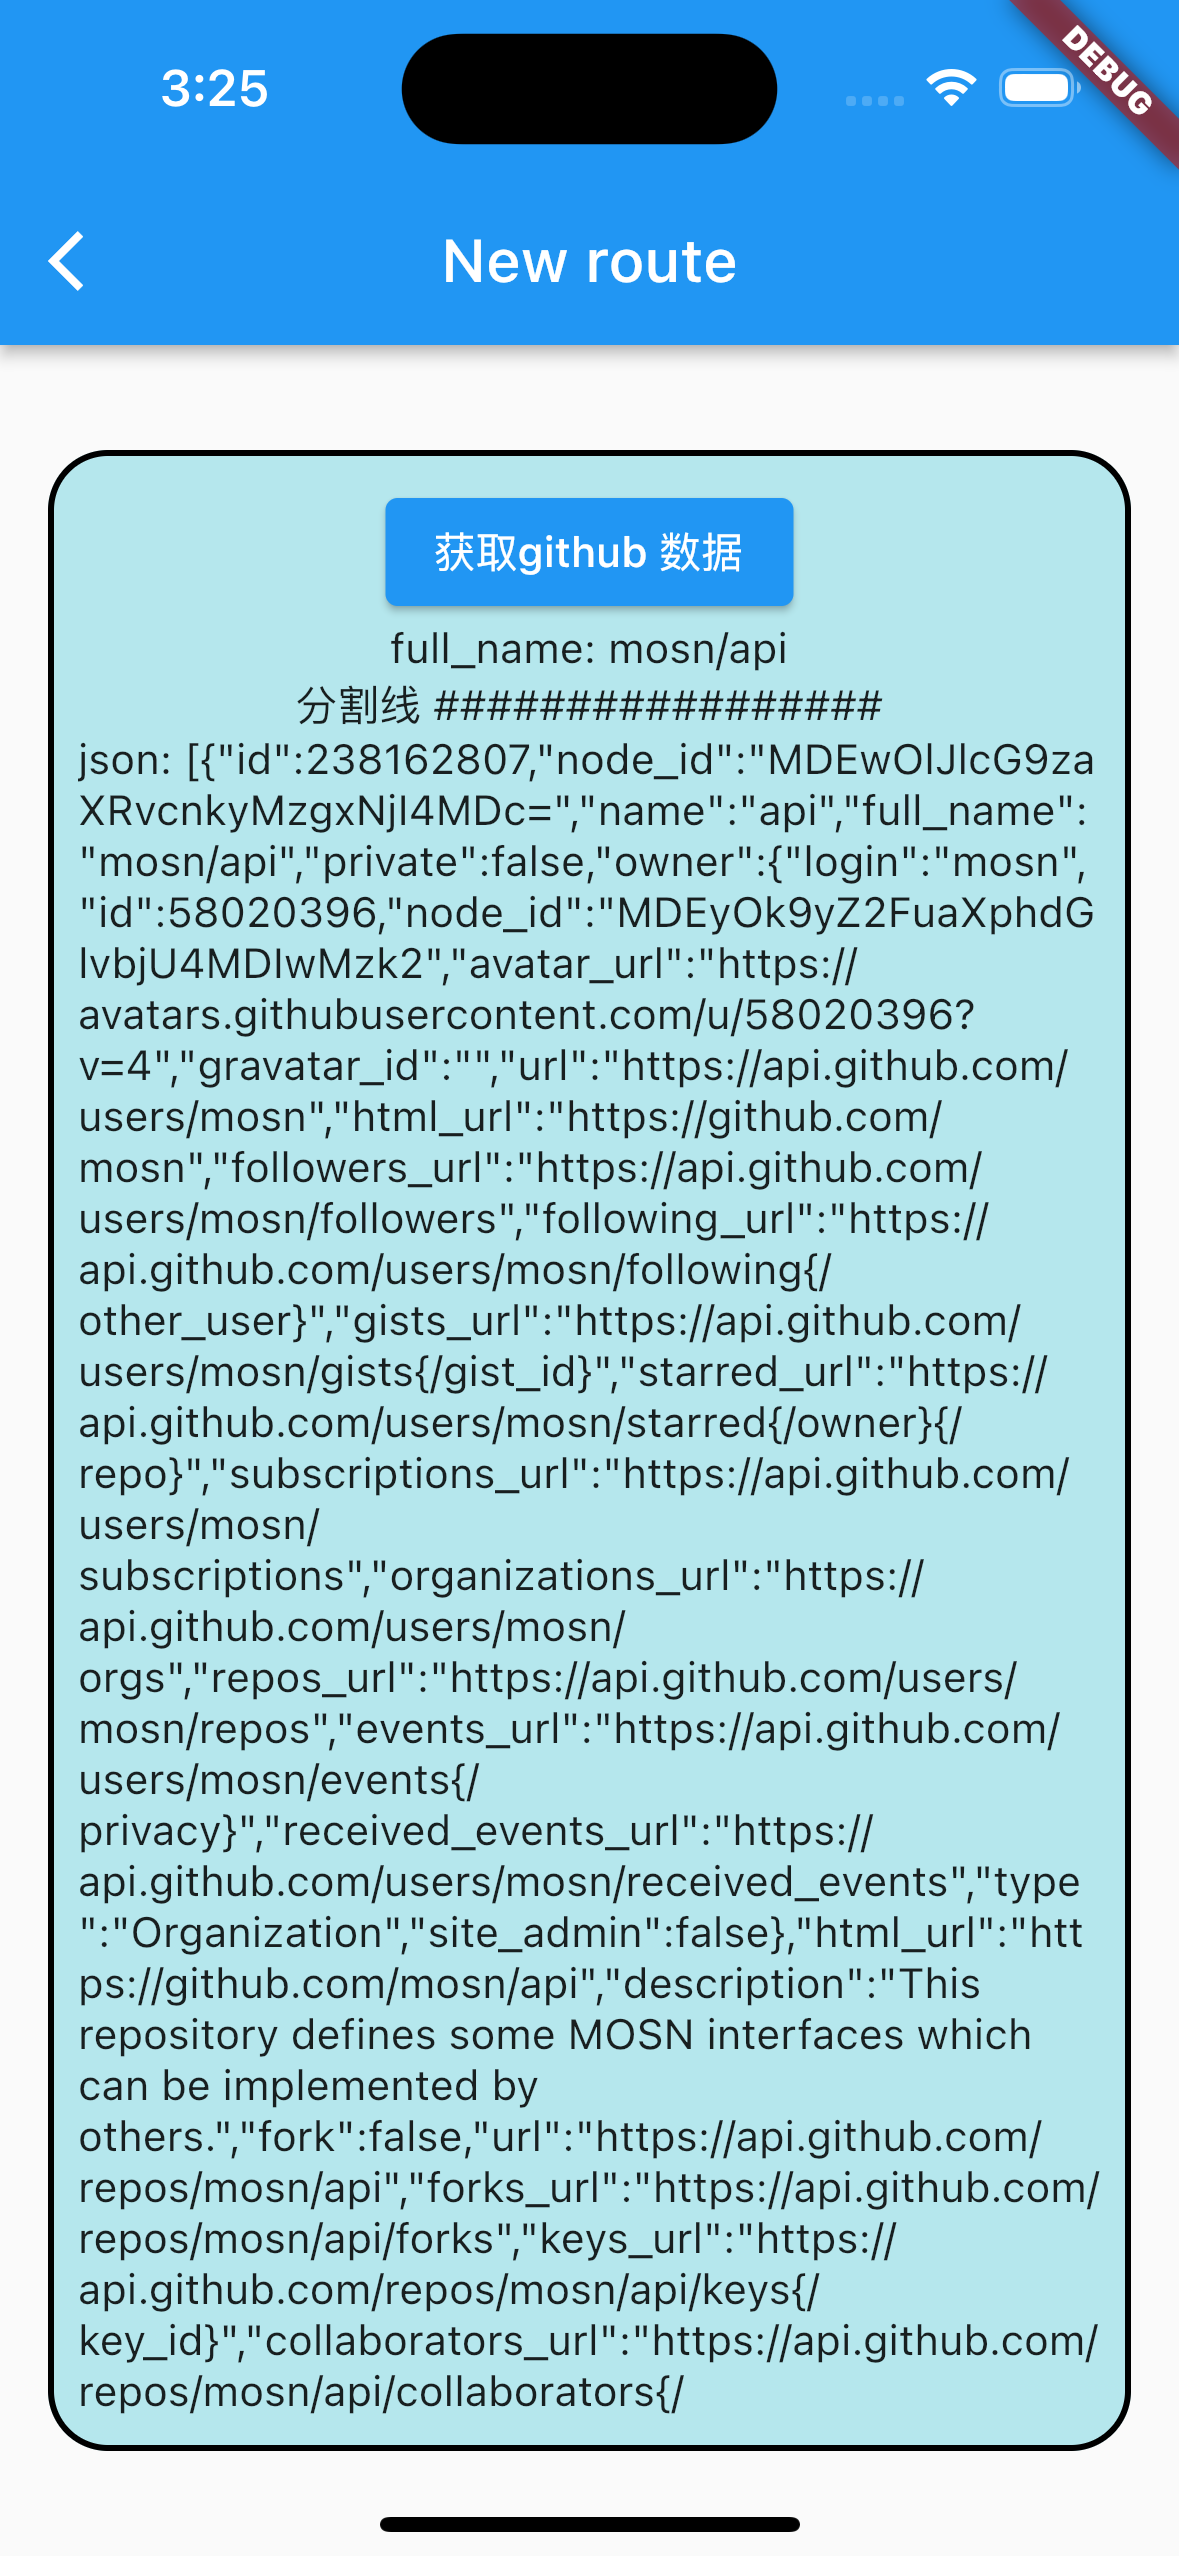
class HttpTestRoute extends StatefulWidget {
@override
_HttpTestRouteState createState() => _HttpTestRouteState();
}
class _HttpTestRouteState extends State<HttpTestRoute> {
bool _loading = false;
String _text = "";
String _name = "";
@override
Widget build(BuildContext context) {
return SingleChildScrollView(
child: Column(
children: <Widget>[
ElevatedButton(
child: Text("获取github 数据"),
onPressed: _loading ? null : request,
),
Container(
width: MediaQuery.of(context).size.width - 50.0,
child: Column(
crossAxisAlignment: CrossAxisAlignment.center,
children: <Widget>[
Text("full_name: $_name"),
Text("分割线 #################"),
Text("json: $_text")
]))
],
),
);
}
request() async {
setState(() {
_loading = true;
_text = "正在请求...";
_name = "未获取";
});
try {
//创建一个HttpClient
HttpClient httpClient = HttpClient();
//打开Http连接
HttpClientRequest request = await httpClient.getUrl(Uri.parse(
"https://api.github.com/users/mosn/repos?per_page=100&page=1"));
//添加 headers
request.headers.add(
"Authorization",
"token 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",
);
//等待连接服务器(会将请求信息发送给服务器)
HttpClientResponse response = await request.close();
//读取响应内容
_text = await response.transform(utf8.decoder).join();
var jsonDecode = json.decode(_text);
// print(jsonDecode);
var obj = jsonDecode[0];
print("测试");
print(obj["full_name"]);
_name = obj["full_name"];
//关闭client后,通过该client发起的所有请求都会中止。
httpClient.close();
} catch (e) {
_text = "请求失败:$e";
} finally {
setState(() {
_loading = false;
});
}
}
}
Demo:
https://github.com/summerxx27/flutter_ios_demo
参照